Posted on

Mobility scooter or wheelchair – which is right for you?

Mobility scooter or wheelchair: which is right for you?

The trip to the mailbox, a shop nearby or an appointment at the doctor’s office can take a disproportionate amount of effort for someone with limited walking ability. So if you are comparing a mobility scooter or wheelchair, you should consider more than just the drive, price or range. What matters is which journeys are made regularly, how safely the person can sit and transfer, and what support is available in everyday life.

A mobility scooter and a wheelchair can both help maintain independence, but they serve different purposes. Choosing the right option reduces strain, improves safety and makes it easier for family members and professional caregivers to provide support.

Comparing a mobility scooter or wheelchair: purpose matters

A mobility scooter, often also called a senior scooter or electric scooter, is designed primarily for longer journeys outside the home. It is usually steered using a tiller, has three or four wheels and, depending on the model, offers considerably greater range than a powered wheelchair. It can be a good choice for getting around the neighbourhood, attending medical appointments, going to the supermarket or taking walks on paved paths.

A manual wheelchair, by contrast, is generally more manoeuvrable and better suited to indoor use. The user can propel it themselves, or a companion can push it. Powered wheelchairs are a separate product category: they combine the seating position and manoeuvrability of a wheelchair with a motor. Anyone who can put very little weight on their legs and also needs to navigate narrow indoor spaces should consider this alternative.

So the key question is not: Which mobility aid is better in general? It is: Where, for how long and with what level of support will it be used every day?

Assess routes, surfaces and available space realistically

A step-free entrance, sufficiently wide paths and a sheltered place to park and charge are essential requirements for a mobility scooter. Kerbs, slopes, loose surfaces and narrow doorways should also be checked before buying. On many models, four wheels provide greater stability, especially when turning and on uneven surfaces. Three-wheeled versions can have a tighter turning circle, but require confidence when driving.

In a small home with a narrow hallway, a cramped bathroom and many door thresholds, a mobility scooter often has its limitations. A wheelchair with a suitable overall width is usually more practical there. Seat width is not the only factor. Footrests, armrests and drive wheels also determine whether the wheelchair can actually fit through a doorway.

A folding or dismantling wheelchair is often the more convenient option for transporting in a car. Dismantling mobility scooters are available, but their weight, loading aids and the vehicle’s load capacity must be carefully matched. A permanently installed vehicle lift can be useful if the scooter is used frequently, but it requires additional planning and expense.

Range is about more than the number of kilometres

A mobility scooter’s range depends on the battery, user weight, temperature, tyre pressure, slopes and driving style. The manufacturer’s stated range is usually based on favourable conditions. Anyone who regularly travels longer distances should therefore allow for a sufficient reserve and make sure there is a suitable charging option at home.

For short, recurring journeys, a very long range may be less important than easy access, good suspension and straightforward controls. Batteries should be charged and maintained according to the manufacturer’s instructions. Running out of charge while out and about means more than just an interruption; it can pose a real safety risk.

Physical needs and seating comfort

A mobility scooter requires the user to be able to sit stably, steer, brake and assess traffic conditions appropriately. Trunk stability, sufficient hand mobility, and good vision and reaction time are particularly important. Safe transfers on and off the seat also deserve attention: Can the person move from the bed, chair or rollator onto the seat? Is a transfer aid or assistance from a caregiver needed?

A wheelchair can be adapted more closely to individual needs. Seat width, seat depth, backrest, armrests, leg supports and headrests all affect posture and pressure distribution. For prolonged sitting, a suitable seat cushion and pressure ulcer prevention measures may be necessary. People at increased risk of pressure ulcers should have their seating assessed by a specialist rather than choosing based on comfort alone.

Seat comfort also matters with a mobility scooter. An adjustable seating position, armrests and suspension can reduce strain on the back, hips and knees. However, the seat must be adjusted so that pedals, brakes and controls remain within reach without overextending.

Safety at home and on the road

Depending on the model, a wheelchair needs parking brakes, anti-tip devices, reflective elements and, if required, a pelvic belt or other positioning aids. It is a good idea to show family members and caregivers how to push the chair over thresholds, slopes and kerbs. Incorrect transfers or tipping the wheelchair can cause injuries.

With a mobility scooter, the user actively takes part in road traffic. Lights, indicators, mirrors, the horn and brakes must be in working order. Before the first trip, practise operating the scooter, braking distance, cornering and reversing in a quiet area. Wet conditions, fallen leaves, snow and poor visibility significantly increase the risk.

The permitted maximum speed and classification for road use depend on the vehicle in question. Certain models may be subject to insurance or identification requirements. Before use, check the current legal requirements and the manufacturer’s documentation. Safe driving also requires that medication, medical conditions or acute fatigue do not impair the user’s ability to react.

Costs, assistive device provision and maintenance

When medically necessary, a wheelchair can be prescribed as a medical aid. Whether and to what extent a health insurance fund covers the device depends, among other things, on the diagnosis, individual needs, contractual providers and approval. A doctor’s prescription alone does not automatically mean that every preferred model will be covered.

Mobility scooters are not always reimbursed in the same way as conventional wheelchairs. It is especially advisable to clarify this early with the health insurance fund, the treating team or a qualified assistive device adviser. Anyone buying privately should consider not only the purchase price but also the battery, maintenance, spare parts, potential repairs, insurance and transport.

Care facilities have additional considerations: How will use be documented? Who checks the charge level? Where can the device be stored in compliance with fire safety requirements? And which staff members are allowed to assist residents with transfers? Clear responsibilities help prevent breakdowns and improve operational safety.

Don’t choose based on the brochure alone

Technical specifications are useful, but they are no substitute for trying out the equipment. A test drive on a mobility scooter should take place, if possible, along the routes the user actually takes: from the entrance to the home, up the ramp and along the intended route. A wheelchair should be tested in the home, bathroom, kitchen and vehicle. Only then will tight spaces, the effort required and transfer difficulties become apparent.

Measure doorways, the lift, storage space and, if necessary, the car boot in advance. Also note how long the user sits each day, whether a caregiver is available and which routes are used regularly. This information makes a consultation much more focused. In cases involving complex support needs, coordination between the doctor, therapist, care team and assistive device provider may be helpful.

When each option is often the right fit

A mobility scooter is often a good choice when the user needs to travel longer distances outdoors independently, can sit and operate the vehicle safely, and has space at home to charge it. A wheelchair is often the better option when mobility is needed mainly inside the home, in care facilities or for accompanied trips.

Some people need both: a wheelchair tailored to their needs for indoor use, transfers and medical appointments, and a mobility scooter for independent trips in their local area. This combination is not contradictory; it can meet everyday needs more effectively.

The best mobility aid is one that can actually be used every day—safely, comfortably and in a way that suits the user’s abilities, spaces and routes. Careful testing provides more confidence than any general recommendation.

Posted on

How to get a wheelchair prescription properly processed

How to get a wheelchair prescription filled correctly

A wheelchair prescription is often the first administrative step towards greater mobility, safety and independence. However, simply having a prescription is not enough. For a wheelchair to truly meet the user’s needs in everyday life, medical requirements, living situation, body measurements, intended use and health insurer requirements must all be considered together.

A wheelchair is a medical aid, not a standard product. A seat that is too wide can make self-propulsion more difficult, while an unsuitable seat height can make transfers to a bed or toilet unsafe. The choice is also significantly influenced by whether the wheelchair is needed temporarily after surgery or on a long-term basis for a neurological or orthopaedic condition.

When will a doctor issue a wheelchair prescription?

A doctor may prescribe a wheelchair if walking is not sufficiently safe, either temporarily or on a long-term basis, and a wheelchair can support mobility, participation or care. Common reasons include the effects of a stroke, paralysis, severe joint conditions, significant unsteadiness when walking, reduced mobility after surgery or progressive neurological conditions.

For statutory health insurance to cover the medical aid, it must be medically necessary. This is not just about travelling distances outside the home. Moving around the home independently, making safe transfers, taking part in family life or easing the burden on family caregivers may also be relevant to the provision of a wheelchair.

The prescribing doctor should clearly document the diagnosis, functional limitations and specific need for the medical aid. A simple entry such as “wheelchair” may be sufficient for basic standard provision, but is often not enough for special models or accessories. The more precisely the need is described, the easier it is to justify the provision on medical grounds.

Wheelchair prescription: What should it include?

A wheelchair prescription should include the insured person’s personal details, the date of issue, the diagnosis or a clear medical justification, and the doctor’s signature. Specifying the medical aid clearly is particularly important.

For a standard wheelchair, for example, a lightweight wheelchair or a transit wheelchair can be prescribed. If there is a specific need, this should also be stated. This might include an elevated leg rest after surgery, a headrest for someone with limited trunk control, a therapy table, a pelvic belt or a pressure-relieving seating system.

Accessories are not automatically approved along with the wheelchair. They must be medically necessary and should be listed individually on the prescription or in a supplementary justification. This also applies to power-assist systems, special backrests, seat cushions and safety equipment. A preference for added comfort alone generally does not justify coverage, although it may be available as a privately funded upgrade.

Which wheelchair is right for the user’s needs?

The choice of model depends first and foremost on the user’s mobility. A standard wheelchair is suitable for many temporary needs, for example after an injury or when walking is temporarily restricted. For regular use, a lightweight wheelchair is often easier to handle. It is usually easier to push, fold and load into a vehicle.

If the person can propel the wheelchair independently and will need it on a long-term basis, an active wheelchair may be a suitable option. In this case, seating position, wheelbase, centre of gravity and individual measurements are particularly important. A attendant-propelled wheelchair, by contrast, is designed to be pushed by relatives or care staff and may have an adjustable backrest and removable or elevating leg rests.

Power wheelchairs and mobility scooters may be suitable for people with significantly limited arm strength, low stamina or regular longer-distance travel. They place greater demands on controls, safe operation, available space and maintenance. Whether a powered model is approved always depends on the individual case and medical necessity.

When providing advice, it is important to consider specific everyday situations: Will the wheelchair fit through doorways? Are there thresholds, narrow corridors or a lift? Will the mobility aid be transported in a car? Can the person apply the brakes and operate the footrests independently? In home care, it should also be checked whether transfers can still be carried out safely using existing aids such as a shower chair, toilet aid or care bed.

How provision through health insurance works

With a doctor’s prescription, the patient contacts a provider of rehabilitation and assistive devices. The provider offers advice, helps select a suitable model and takes measurements if needed. For complex cases, a detailed needs assessment may be required, taking into account seating measurements, mobility, skin condition, trunk stability and the home environment.

Many statutory health insurance funds work with contracted providers. These providers submit the required documents to the health insurance fund and coordinate the provision. Whether prior approval is required depends on the health insurance fund, the assistive device and the prescribed features. An assessment before delivery is customary for individually customised, powered or particularly expensive wheelchairs.

As a rule, the health insurance fund covers the cost of provision that is adequate, appropriate and cost-effective. This does not necessarily mean that every requested model or design will be reimbursed. Anyone opting for additional comfort, materials or features should clarify in writing in advance which costs they will have to pay themselves.

In many cases, adults with statutory health insurance must pay a statutory co-payment of €10, up to the actual cost of the item. This does not apply if they have an exemption from co-payments. Minors are not required to make a statutory co-payment. People with private health insurance should check their policy and the requirements for a cost estimate, prescription and reimbursement before placing an order.

Buying or renting: Which makes sense for a wheelchair?

If mobility is restricted for a limited time, renting is often the most cost-effective and practical solution. This may apply, for example, during rehabilitation after hip surgery, while waiting to recover or in the case of temporary mobility restrictions. Maintenance and return are then part of the agreed arrangement.

For long-term needs, ongoing provision may be appropriate. However, many wheelchairs remain the property of the health insurance fund and are provided as loaned assistive devices. This is common for standard models. This does not mean the user receives an inferior service, but any changes, repairs or replacements must be arranged through the responsible provider.

Buying a wheelchair privately may make sense if an additional model is needed at short notice, for example for travel or for a second floor of the home. However, without prior agreement, there is a risk that the health insurance fund will not cover costs already incurred. A doctor’s prescription should therefore not be treated as a mere formality before making a purchase.

Special considerations for care, hospital discharge and facilities

Wheelchair provision should be arranged, wherever possible, before discharge from hospital. The hospital social worker, treating doctors, therapists and relatives should work together at an early stage, particularly if there are stairs, a lack of support at home or a greater need for assistance with transfers. Leaving arrangements too late can mean that the mobility and safe care needed in the first few days after returning home are not available.

In care facilities, it must be clear whether the wheelchair is prescribed for an individual or forms part of the facility’s general equipment. An individually customised wheelchair is usually assigned to a specific person. General-purpose transport or shower wheelchairs, on the other hand, may be part of the equipment a facility is required to provide. This distinction is essential for determining cost coverage, maintenance and responsibilities.

Regular checks are worthwhile even when a wheelchair is already in use. Pressure sores, weakening brakes, unstable footrests or changing seating needs are not minor issues. Changes in weight, a decline in trunk stability or surgery may mean that adjustments or a new wheelchair are needed.

A suitable wheelchair does more than provide mobility. It can make transfers safer, reduce the burden on care staff and help people regain a greater degree of independence. Arranging expert advice early and describing everyday needs in detail when discussing the prescription provides the best basis for provision that will work well in the long term.

Posted on

Choosing a patient lift for home care

Choosing patient lifts for home care

A transfer from bed to wheelchair can become a daily physical challenge for people requiring care and their caregivers. So, if you want to choose a patient lift for home care, you should consider more than just the price and weight capacity. The key is whether the assistive device suits the person’s mobility, the available space, and the recurring transfers involved in everyday care.

A correctly selected lift can help prevent falls and physical strain, support dignified mobility, and reduce the physical burden on caregivers. An unsuitable model, on the other hand, can create unsafe lifting situations or simply be impossible to use in a cramped bedroom.

Which patient lift suits the level of assistance required?

The most important question comes before choosing a product: Can the person receiving care still help safely, bear weight through their legs, and follow instructions? The answer determines the type of equipment needed.

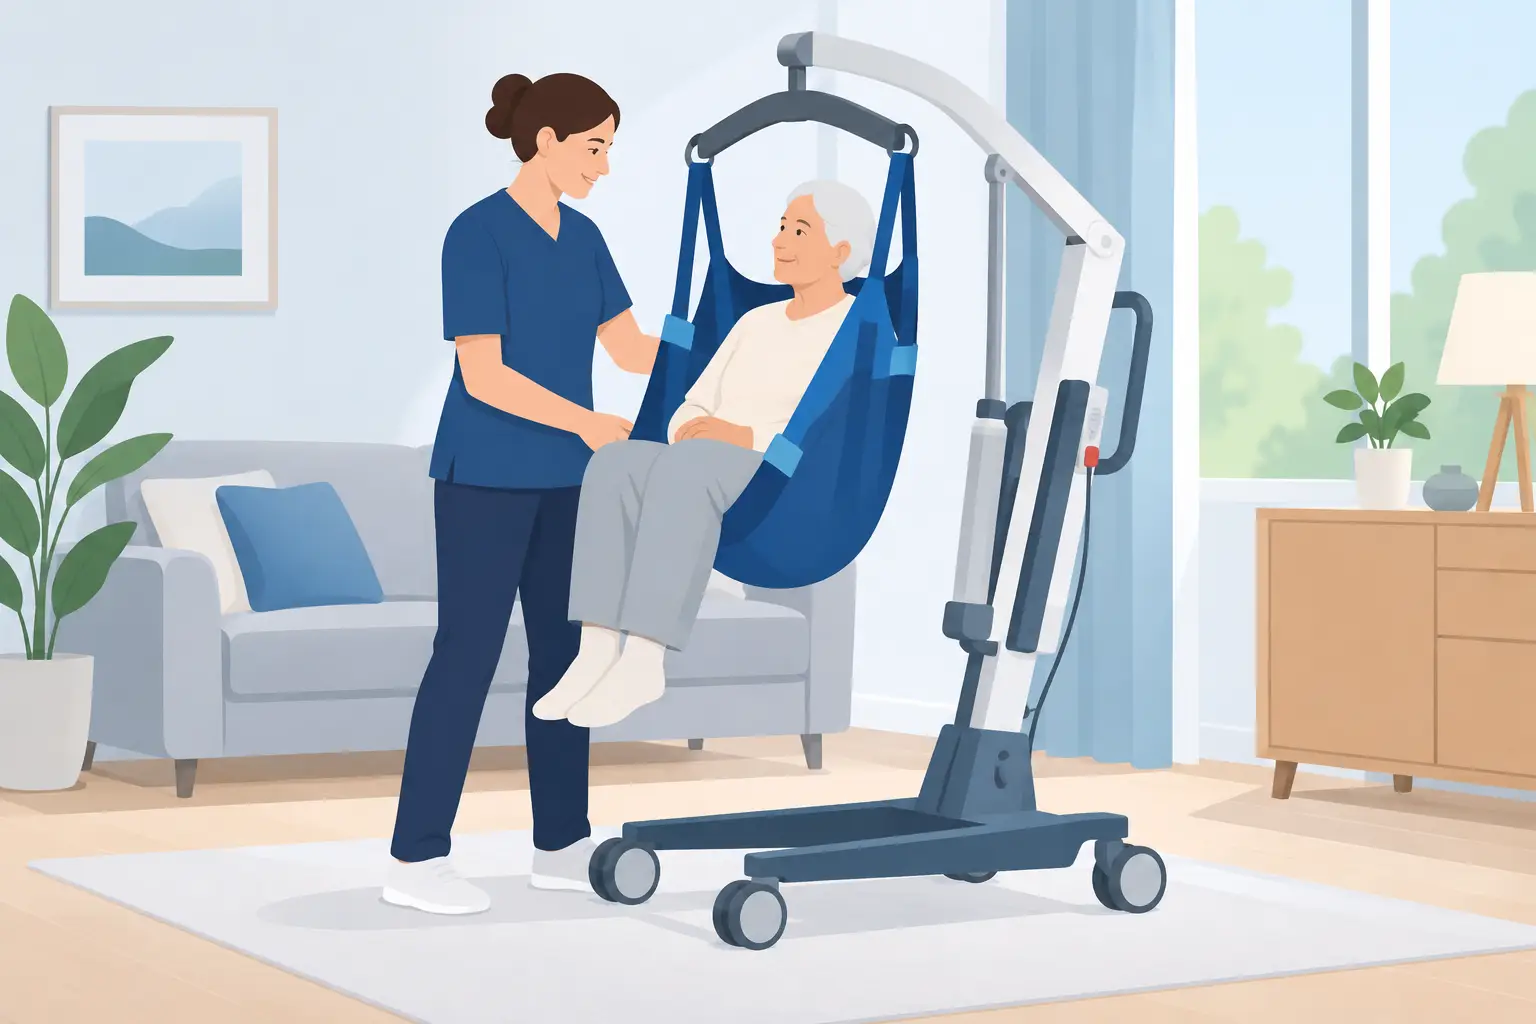
A mobile patient lift with a wheeled base is designed for people who need to be transferred entirely or largely passively. It lifts the person using a sling and enables transfers, for example, from a bed to a wheelchair, commode chair, or suitable care chair. This type is often used when trunk and leg control are severely impaired.

A sit-to-stand lift, also called a standing or active lift, requires the person to retain sufficient function. They must be able to hold on to the handgrips, place their feet securely on the footplate, and bear at least some of their weight on their legs. It is suitable, for example, for transfers from bed to wheelchair or toilet when the person can still stand with assistance. If the person cannot bear weight while standing, a sit-to-stand lift is not a safe alternative to a passive patient lift.

Ceiling lifts are especially useful when transfers are regularly made between the same areas and a high level of assistance is needed over the long term. The rail system keeps the floor clear and makes it easier to move around in small rooms. However, installation must be planned in line with the building structure and carried out by qualified professionals. For temporary care or use in changing locations, a mobile lift is often more flexible.

Choosing a patient lift for home care: assessing weight capacity correctly

Maximum weight capacity is a safety specification, not a rough guide. It must reliably accommodate the actual body weight of the person receiving care. You should also allow for a sufficient safety margin, especially if a heavy sling, clothing, orthopedic aids, or other positioning elements are used.

The design of the lifting arm is also important. The maximum lifting height determines whether transfers from a care bed, a wheelchair with a higher backrest, or a low seat can be carried out easily. The base must have sufficient clearance if the lift needs to be positioned under a bed, chair, or wheelchair. Not all furniture provides enough floor clearance.

On mobile lifts, the spread of the base legs affects stability. Legs that spread wider can improve stability and make it easier to maneuver around a chair. At the same time, they take up more space. A model with large dimensions may be impractical in a narrow bathroom or between a bed and a wall. That is why measuring is part of the selection process: check door widths, turning space, clearance under the bed, and the distance to furniture before buying.

The right sling is essential for comfort and safety

The sling is not an interchangeable accessory, but a central part of the transfer system. It must suit the person’s body shape, the transfer destination and their individual sitting or trunk stability. A sling that is the wrong size can dig in, slip or cause an uncomfortable sense of insecurity.

Universal slings are often suitable for everyday bed-to-wheelchair transfers. For people with limited head and trunk control, models with a head support are generally the better choice. Toileting slings allow easier access to the intimate area, but provide less full-body support. They are only suitable if the person can sit with sufficient stability and the selected sling is approved for this purpose.

Check the size specified by the manufacturer and the compatible suspension systems. Loop, clip and spreader bar attachments cannot be combined arbitrarily. The sling and hoist should be used as a coordinated system. Professional advice is particularly useful in cases of sensitive skin, risk of pressure ulcers, contractures, spasticity or pain. In these cases, the choice of material, leg support or head support alone can make transfers considerably more comfortable.

Hygiene requirements must also suit everyday care routines. Washable slings make repeated use easier, provided the care instructions are followed. Higher hygiene standards apply in cases of infection, incontinence care or use by multiple people. A second sling may be useful to ensure a suitable transfer remains possible while the other one is being washed.

Check the actual transfer routine before buying

A patient hoist is not purchased for a single occasion, but for recurring routines. So make a note of when and where transfers take place: from the care bed to the wheelchair in the morning, to the toilet during the day, back to bed in the evening or to the shower area for personal care. The requirements vary considerably.

For toilet transfers, manoeuvrability, the opening function of the legs and the seat height of the destination surface are particularly relevant. Transfers from the floor after a fall have their own requirements. Not every standard hoist is suitable for lifting someone from the floor, and especially after a fall, it must first be established whether an injury may have occurred. If there is pain, misalignment, a change in consciousness or an unclear cause, do not attempt to move the person without professional assistance.

The person’s ability to assist may also vary throughout the day. After a neurological condition, or in cases of dementia, Parkinson’s disease or severe fatigue, their level of mobility is often inconsistent. A mobility aid must therefore be suitable for less favourable situations, not just for the best part of the day.

Safe use requires training and consistent procedures

A patient hoist does not replace proper transfer technique. Before first use, training should be provided by a qualified professional, for example as part of the provision of the mobility aid or by an outpatient care service. Family caregivers need to know how to fit the sling correctly, check the suspension and adjust the base width.

Before every transfer, check the brakes, battery charge, sling, loops or clips, and that the route is clear. The person must not be left unattended while being lifted. Calm communication is important during transfers: explain each step, ensure the person is as upright and comfortable as possible, and avoid unnecessary swinging movements.

The brakes are used according to the intended procedure. With many mobile patient lifts, the lift is not locked during raising, allowing the chassis to align beneath the center of gravity. The manufacturer’s instructions and the training provided for the specific model are always decisive. Personal habits or assumptions based on other devices can pose a safety risk.

Regular visual inspections are also essential. Damaged seams, frayed loops, tears in the sling material, unusual noises or restricted lifting functions must not be ignored. The device should not be used again until it has been inspected or repaired.

Consider costs, prescriptions and coverage

A patient lift may be prescribed as a medical aid when medically necessary. Whether and to what extent the health insurance fund covers the costs depends on the individual circumstances, the prescription and the applicable contractual terms. Other authorities may be responsible for nursing care aids or home adaptations in some cases.

Before purchasing, it is worth consulting the doctor’s office, a care advisory service, the health insurance fund or the long-term care insurance fund. A precise description of the transfer difficulties is helpful: Can the person no longer stand up safely? Is manual transferring no longer medically reasonable for family caregivers? Are several transfers needed each day? The more clearly the care needs are documented, the easier it is to identify a suitable aid.

If purchasing privately, remember to factor in not only the device but also lifting slings, batteries, the charger, maintenance and any spare parts. The availability of suitable accessories and wear parts is particularly important when the device is used on a regular basis. Servomed can help with a wide range of products for home care and professional care needs.

A good patient lift fits into everyday life without defining the person by their limitations. Take the time to check measurements and transfer scenarios and arrange professional instruction—then a technical aid can make a tangible difference for everyone involved.

Posted on

Choosing a suction machine for home care with confidence

How to Choose a Safe Secretion Suction Device for Home Care

When thick mucus cannot be coughed up independently, reliable suction often has an immediate impact on breathing, well-being and safety. A suction machine for home care is therefore not a general-purpose comfort device, but a medical device that must meet the needs of the individual diagnosis, prescribed therapy and home-care situation. Especially in cases involving a tracheostomy, neurological conditions, a weak cough or an increased risk of aspiration, proper selection and instruction go hand in hand.

When a suction machine may be needed at home

Suction machines remove secretions from the upper airways or, when medically indicated, from a tracheostomy tube. They are used, among other situations, for people who cannot clear or cough up secretions sufficiently. This may be necessary temporarily after surgery, or on a long-term basis for people with serious neurological or pulmonary conditions.

Suction is intended to clear the airways, reduce noisy breathing and help prevent complications caused by a build-up of secretions. However, it is no substitute for medical assessment. Worsening shortness of breath, unusual blue discoloration of the lips or skin, changes in consciousness, heavy bleeding or a sudden significant deterioration in the secretion situation are emergencies. In these cases, seek medical help immediately rather than trying to treat the cause through repeated suctioning alone.

Whether a portable or stationary device is more suitable depends on the care routine. People who are mainly cared for in bed often need a stable mains-powered device with easily accessible controls. For frequent medical appointments, therapy sessions or outings, a battery-powered model can provide the necessary mobility. For people with a tracheostomy, a backup plan is also essential: depending on the level of risk, a replacement device or a clearly defined emergency care plan may be needed.

Suction machine for home care: what to look for

The highest adjustable vacuum level does not automatically make a device more suitable. The key factors are the medical prescription and the instructions of the care team. Vacuum pressure and suction duration must be appropriate for the person’s age, condition, access route and individual mucosal health. Excessive vacuum pressure or suctioning for too long can injure the mucous membranes, cause pain and impair oxygenation.

Vacuum pressure, flow rate and operation

A suitable device allows the prescribed setting to be adjusted precisely and clearly. The scale must be easy to read, the regulator must work reliably and the vacuum must build up consistently. The flow rate indicates how much air the device moves. It is relevant, but is not enough as a standalone comparison metric. Safe care depends on how it works together with the required vacuum pressure, tubing system and intended use.

Ease of use is just as important in the home. Large buttons, a clear display and simple assembly help family members and care staff operate the device correctly, even in stressful situations. Quiet operation can be helpful for people who are sensitive to noise. Very small devices are easy to transport, but depending on the model may have smaller collection containers or shorter battery life. These trade-offs should be considered before care begins.

Power supply and place of use

Mains power is often the most reliable option for continuous use. For portable devices, check how long the battery lasts under realistic conditions and whether a spare battery, car charging cable or power adapter is included. Batteries must be charged regularly and checked to ensure they are working properly—even when the device is kept on hand only for possible emergencies.

The intended location should be dry, clean and easy to access. The device needs a designated place where hoses will not pose a tripping hazard and the power cord will not be under tension. As a rule, a suction device should not be placed in the bathroom, close to splashing water or next to heat sources. For care rooms, a solution that keeps consumables and personal protective equipment neatly organised and within easy reach is recommended.

Secretion canister, filter and tubing system

The secretion canister must have enough capacity for the expected volume of secretions and be securely sealed. Disposable canisters simplify hygienic disposal, while reusable systems must be cleaned and disinfected, depending on their design. The right option depends on how often the device is used, the hygiene facilities available at home and the manufacturer’s instructions.

Bacterial filters, connecting tubes and suction catheters are not interchangeable accessories. They must be compatible with the device in question and replaced in accordance with the instructions for use. For tracheostomy care, the choice also depends on the size of the cannula, the suction technique and, where applicable, whether a closed suction system is used. Different tips are often used for suctioning the mouth and throat than for tracheal suctioning. The treating healthcare professional will determine which materials are suitable.

Training is part of safe care

A device alone cannot ensure safe care. Family members and caregivers must receive practical training before using it independently. This includes assembling it correctly, checking that it is working, setting the prescribed negative pressure and following hygienic practices. Monitoring the person during and after suctioning is also part of the training.

A clear procedure for recurring situations is important: What should be done when secretions can be heard? When should suctioning be performed, and when should the person first be repositioned, humidification provided or inhalation carried out in accordance with their individual treatment plan? When should the home care service, doctor’s office or emergency services be contacted? Written instructions from the care team give family members confidence and help prevent suctioning from being performed too frequently or unnecessarily due to uncertainty.

Training requires particular care and time for children, people with limited ability to communicate or people with high levels of anxiety. In these cases, it is not just the technical procedure that matters, but also calm preparation, gentle positioning and recognising signs of distress in the individual. Suctioning must never be performed by force.

Hygiene, reprocessing and daily checks

Hygiene is a key safety factor when using respiratory aids. Hands must be thoroughly disinfected before and after care. Single-use items such as sterile suction catheters must only be used as intended and then disposed of properly. Reusable parts must be cleaned, reprocessed and dried exclusively in accordance with the manufacturer’s instructions. Moisture in tubes or canisters can increase the risk of microbial contamination.

Before use, it is worth carrying out a quick function check. Are the lid and tubing securely fitted? Is the filter installed correctly? Does the device generate the required negative pressure? Is the battery sufficiently charged? Are the container and consumables available? These checks take only a few minutes and help prevent avoidable interruptions during care.

A regular replacement and cleaning schedule helps keep everything organized. For example, record filter changes, reprocessing dates, battery checks and when a new supply of consumables is opened. In households with several caregivers, this documentation prevents misunderstandings. In care facilities, keeping a clear record of the device, accessories and maintenance intervals is also important for internal quality assurance.

Prescriptions, medical aid provision and ongoing costs

Secretion suction devices may be prescribed as medical aids when medically necessary. Whether and to what extent the health insurance provider covers the costs depends on the prescription, the contracted providers and the individual’s entitlement to benefits. Ongoing costs should also be taken into account, including secretion containers, filters, tubing, catheters, batteries and, where applicable, maintenance.

Before purchasing or applying for a device, clarify which accessories are needed regularly and who will arrange resupply. For prescribed medical aid provision, coordination between the doctor’s office, health insurance provider, supplier, care service and family members is especially valuable. This helps prevent a situation where a suitable device is available but essential consumables are missing.

Servomed supports the procurement of medical aids with a range that brings together suction technology, respiratory therapy and care supplies. However, the individual professional instructions remain decisive for every secretion suction device, particularly for tracheal suctioning and complex medical conditions.

A well-prepared suction device provides one thing above all in everyday care: the ability to act. When the device, accessories, hygiene procedures and emergency contacts are reliably organized, family members and care staff can provide care more calmly and give the person receiving care the attention they need.

Posted on

Inhalation Device for Chronic Bronchitis

Inhalation device for chronic bronchitis

When coughing and thick mucus dominate your mornings, an inhalation device for chronic bronchitis can be a useful addition to the prescribed respiratory therapy. It does not replace a medical diagnosis or medication, but it can help deliver inhalation solutions to the airways as a fine mist. The price and size of the device are not the only factors that matter: the right particle size, ease of everyday use, and consistent hygiene are also essential.

By definition, chronic bronchitis is present when coughing and sputum occur for at least three months in each of two consecutive years. It is often associated with smoking, exposure to pollutants, or chronic obstructive pulmonary disease, or COPD. Anyone experiencing shortness of breath, frequent infections, or increasing sputum should always have their treatment supervised by a doctor.

What an inhalation device can do

Inhalation devices turn a specified liquid into an aerosol. The fine droplets are inhaled through a mouthpiece or mask. Depending on the size of the aerosol particles, they can act mainly in the mouth and throat, the bronchi, or deeper in the lungs. For chronic respiratory conditions, this targeted delivery is a key advantage over steam: hot water vapor does not reach the lower airways in the same way and also poses a risk of scalding.

The treating medical practice determines which solution should be inhaled. This may be sterile saline or, when needed, a medication approved for nebulization. Medication must not be mixed, dosed, or put into a device independently unless it is explicitly intended for that purpose. Essential oils, chamomile infusions, and homemade saline solutions generally do not belong in medical nebulizers. They can irritate the airways, trigger allergies, or damage the device.

A nebulizer can help loosen mucus, moisten the mucous membranes, and make regular medication inhalation easier. However, the extent of the benefit depends on the underlying condition, the inhalation solution, and correct technique. In the event of acute severe shortness of breath, bluish lips, chest pain, a high fever, or a noticeable worsening of symptoms, seek medical help promptly—a nebulizer is not an emergency treatment.

Choosing an inhalation device for chronic bronchitis

For home use, the main options are jet nebulizers, mesh nebulizers, and, in certain situations, ultrasonic nebulizers. These types of devices differ in how they work, their noise level, maintenance requirements, portability, and suitability for particular medications. Not every medication can be nebulized with every type of device. The medication instructions and the device manufacturer’s specifications must therefore be followed.

Jet nebulizers for regular use

Jet nebulizers usually work with a compressor. They are a well-established, versatile option for regular respiratory therapy and are often suitable for various inhalation solutions. The device sits securely in place, operation is straightforward, and replacement parts such as the nebulizer chamber, tubing, mouthpiece, or mask are available for many systems.

On the other hand, they can be noticeably noisy during operation. For people with limited hand strength or for caregivers, the somewhat more involved setup can still be manageable if all the parts are laid out clearly. For care facilities, clearly labeled accessory sets and reliable reprocessing are particularly important.

Mesh nebulizers for use on the go

Mesh nebulizers are compact, quiet and often battery-operated. This makes them suitable for people who need to inhale while travelling, when out and about or during rehabilitation. Their short nebulization time can help improve treatment adherence.

However, the fine mesh is sensitive to residue. Thorough cleaning immediately after each use is particularly important. Highly viscous solutions or suspensions may also be unsuitable, depending on the model. Before purchasing, check whether the device you want is approved for the specific solution prescribed.

Mouthpiece or mask?

Whenever possible, the mouthpiece is often the preferred option: it directs the aerosol more precisely into the lower airways and reduces deposits on the face or around the eyes. A mask is useful if the mouthpiece cannot be held securely or sealed around, for example in cases of severe weakness, cognitive impairment or certain care situations.

The mask must fit snugly without causing pressure points and must be the right size for the face. Adults generally need an adult mask, while children need a suitably sized child mask. Leaky or poorly fitted masks reduce the amount of medication inhaled and make reliable use more difficult.

What to consider when choosing equipment and purchasing

A suitable device should meet the needs of the person who will use it every day. Alongside medical suitability, practical considerations are important: clearly legible markings on the medication chamber, a non-slip base, simple on/off controls, an adequate hose length and clear instructions. For people with impaired vision, tremors or arthritis, large controls and easy-to-assemble parts can make all the difference.

Before purchasing, it is worth checking ongoing costs and availability. Nebulizer chambers, filters, masks, mouthpieces and hoses are wear-and-tear or hygiene items. The recommended replacement intervals are stated in the relevant instructions for use. Parts must be replaced if they become brittle, discoloured, leaky or visibly damaged. In care facilities, accessories and devices should be labelled for individual patients if they are intended for personal use.

With a doctor’s prescription, an inhalation device may be eligible for reimbursement, depending on the diagnosis, medical aids directory, health insurance provider and supply route. Coverage is not guaranteed in every case. Before placing an order, check the prescription, consult the health insurance provider and confirm which model or product group is accepted. Servomed offers a broad range of inhalation and respiratory therapy devices and accessories to help you choose the right products for home use and professional care.

Inhale correctly: technique matters

Good inhalation starts with clean hands and a properly assembled device. Place the prescribed amount in the nebulizer chamber. Then sit upright and relax as much as possible. Position the mouthpiece between your teeth and seal your lips around it. Breathe in slowly and gently through your mouth, pause briefly, then breathe out gently. This simple routine helps the aerosol settle in the airways.

Breathing hurriedly or very shallowly often means less aerosol reaches the areas where it is needed. Do not speak during treatment. If you feel dizzy, develop an urge to cough or feel unwell, a short break may help. Contact your doctor’s office if symptoms recur or you experience new tightness in your chest.

After using inhaled corticosteroid medication, it is generally recommended to rinse your mouth and spit out the water. This can help prevent local side effects such as hoarseness or a fungal infection in the mouth. Whether this is necessary in an individual case depends on the medication prescribed.

Cleaning helps protect against germs

In chronic bronchitis, the airways are often sensitive. A damp, poorly cleaned nebulizer can encourage the growth of germs, so it should not simply be put away in a drawer while still closed. After each use, the parts that come into contact with the inhalation solution or exhaled air should be taken apart, emptied, cleaned and dried completely, according to the manufacturer’s instructions.

In practice, this usually means rinsing the nebulizer chamber, mouthpiece and mask with warm drinking water or cleaning them as directed. The parts are then left to air-dry on a clean, dry surface. The tubing, compressor, membrane and filter must only be handled as directed in the instructions. Membrane nebulizers in particular can be damaged by improper cleaning.

Regular disinfection may be required, especially for certain models or if someone is more susceptible to infection. Disinfection must be carried out strictly according to the manufacturer’s instructions. If several people in a household share a device, each person needs at least their own patient-contact accessories. In professional care settings, the facility’s hygiene requirements also apply.

When to consult a doctor

Not every cough with sputum requires long-term inhalation therapy, and chronic bronchitis is not always treated in the same way. Medical advice is especially important if the color or amount of sputum changes significantly, shortness of breath worsens, a fever develops or physical stamina noticeably declines. Unexplained weight loss, blood in the sputum or shortness of breath at night should also be investigated promptly.

Anyone already taking medication via a metered-dose inhaler, dry-powder inhaler or nebulizer should have their inhalation technique checked regularly. Often, inadequate treatment results not from the medication itself but from incorrect use or worn accessories. A brief demonstration at a doctor’s office, pharmacy or by trained healthcare professionals can often provide more reassurance than switching devices.

A suitable inhalation device is most helpful when it is medically appropriate, cleaned reliably and easy to fit into everyday life. This helps make respiratory therapy a practical source of support – even on days when coughing and exhaustion demand particular attention.

Posted on

Choosing the right positioning pillow for pressure ulcer prevention

Choosing the Right Positioning Cushions to Prevent Pressure Ulcers

A positioning pillow can make the difference in everyday care between a stable, pressure-relieved position and a stressful posture that places undue strain on the body. When choosing the right positioning pillow for pressure ulcer prevention, you should therefore consider more than just its size or softness. The key factors are the individual’s risk of pressure ulcers, their mobility, the affected areas of the body and the overall care plan, including movement, skin checks and a suitable support surface.

Why positioning pillows are used to prevent pressure ulcers

Pressure ulcers develop as a result of prolonged pressure or a combination of pressure, shear and friction. Areas of the body with little soft tissue over bony prominences are particularly at risk: the sacrum, heels, trochanters in the hip area, ankles, knees, elbows and back of the head. Moisture, malnutrition, circulatory disorders, loss of sensation or limited ability to move independently can further increase the risk.

Positioning pillows are aids used to help prevent pressure ulcers. They redistribute pressure, specifically relieve vulnerable areas or stabilise a position that might otherwise be difficult to maintain. However, they are no substitute for a professional risk assessment or regular repositioning. For people at increased risk, a pressure-relieving mattress or alternating pressure system often remains a key part of care.

Correct positioning should do more than reduce pressure. It must also be safe, comfortable and practical for everyday use. A position that seems ideal in theory but causes pain, restricts breathing or needs constant adjustment is not a good long-term solution.

Choosing the right positioning pillow for pressure ulcer prevention: key criteria

Start by asking: Which area of the body needs to be relieved or stabilised? A pillow for the heels has different requirements from a positioning pillow for the 30-degree side-lying position or a roll used to guide the legs. General-purpose pillows can be useful, but specially designed shapes are often more suitable for people at significant risk or with existing skin damage.

Shape and intended area of use

Wedge-shaped positioning pillows, for example, support the 30-degree side-lying position. In this position, the person does not lie directly on the hip bone but is turned slightly backwards. This can reduce pressure on the trochanter while providing a stable position. The exact design must be suited to the person’s build, bed and mobility.

Rolls and elongated positioning pillows are suitable for relieving pressure on or supporting the arms and legs. Placed between the knees, they can prevent pressure points caused by direct contact. Used under the lower legs, they help keep the heels free of pressure. The pillow must be positioned so that it supports the calf without applying pressure to the Achilles tendon or heel.

Ring cushions and donut cushions may seem pressure-relieving at first, but they are generally not the right choice for preventing pressure ulcers around the sacrum or buttocks. The rim can increase pressure on the surrounding tissue and adversely affect circulation. A healthcare professional should always assess whether these products are appropriate.

Filling material: balancing adaptability and stability

A positioning pillow must adapt to the body without collapsing too much. Fillings that are too soft lose their support under pressure. Pillows that are too firm can create localised pressure, particularly for very slender people or those who are sensitive to pain.

Depending on their design, foam cushions offer good shape retention and can be used to support specific positioning. Viscoelastic materials respond to body heat and weight and can increase the contact area. Microbead or ball fillings are highly adaptable, but require careful shaping and regular checks because the filling can shift.

For practical care, the material alone is not the deciding factor. What matters is whether the cushion retains its function under the actual load. Its load capacity should be specifically checked, especially for people with a higher body weight or those lying down for long periods. A small cushion that gets flattened after a short time will not reliably relieve pressure on an at-risk area.

Size, body type and ability to transfer

The dimensions must suit the person receiving care and the intended use. A wedge cushion that is too short may not adequately support the upper body. An oversized model can overcorrect the position, put strain on the shoulder or make transfers more difficult. People with obesity often need wider, sturdier solutions; smaller cushions that can be positioned more precisely are often more comfortable for very slender people.

The care situation also matters. Can the person change position independently? Is positioning carried out by family members or nursing professionals? Does the cushion need to be removed for every transfer? Models with easy-to-grip, shape-retaining areas are easier to handle. In professional settings, the size and features should also fit the existing positioning and transfer plan.

Position also affects effectiveness

Even a high-quality positioning cushion can create pressure if used incorrectly. After each positioning, check whether at-risk areas are actually free from pressure or adequately relieved. Smooth out creases in clothing, bedding or incontinence products, as they can cause localized pressure.

When lying on the back, the heels and sacrum are particularly vulnerable. The heels should be completely suspended, not merely resting on a soft pad. When lying on the side, there should be no direct pressure on the bony prominence on the side facing down. When lying on the stomach or in a semi-prone position, breathing, medical lines, tubes, stoma care and individual contraindications require particular attention.

The often-cited fixed schedule for repositioning is not a universal rule. How often a position needs to be changed depends, among other things, on skin condition, independent movement, circulation, nutritional status, the mattress and the person’s tolerance. An individualized positioning plan that takes observable skin reactions into account is more reliable than a rigid routine.

Skin checks and comfort are essential

Check the skin regularly, especially in at-risk areas. Non-blanching redness, warmth, hardening, blisters, weeping areas or pain when touched should be taken seriously. If you notice any changes, seek medical or nursing advice promptly. If a pressure ulcer is already present, positioning must be incorporated into the treatment plan.

Comfort is not a minor consideration. Pain, restlessness or a feeling of slipping can lead people to change position on their own or cause family members to reposition them less often. Aim for a neutral joint position, unrestricted breathing and secure support without constricting the body. Individual guidance is particularly useful for people with contractures, spasticity, neurological conditions or severe pain.

Check hygiene and suitability for everyday use before buying

Positioning cushions are often used in direct contact with the skin and may come into contact with sweat, discharge or incontinence. A wipe-clean or washable cover is therefore very practical both at home and in care facilities. Check the care instructions: What washing temperature is permitted, is the cover suitable for tumble drying, and is a replacement cover available?

For care facilities, other relevant considerations include whether the surface can be disinfected, product labelling, reprocessing and the availability of identical models. In private homes, a quiet cover, a pleasant feel against the skin and a weight that family members can handle easily are often important. Easy-care products make it easier to provide hygienic care, but must not be so slippery that the person slides off them.

When professional advice is needed

If there is a high risk of pressure ulcers, existing pressure ulcers, significant immobility or complex comorbidities, product selection should not be made in isolation. A doctor’s prescription, care consultation, wound management specialist or medical equipment professional can help determine whether a positioning cushion is sufficient or whether additional measures are needed, such as a pressure-relief mattress, heel offloading, a seat cushion or other interventions.

Suitable documentation can also be crucial for coverage of the costs. Requirements for prescribed medical aids vary depending on the health insurance provider, care level, contractual partner and individual care needs. A precise description of the need supports the selection of a suitable product and helps prevent inappropriate provision.

A well-chosen positioning cushion works best as part of attentive care: observe positioning, check the skin, reduce pressure and take the affected person’s needs seriously. This makes pressure relief more than a one-off measure—it becomes a reliable routine that supports safety, comfort and dignity in everyday life.

Posted on

How to Adjust Forearm Crutches Correctly: A Guide

How to Adjust Forearm Crutches Correctly – A Guide

After an operation, an injury or when your ability to bear weight is permanently limited, forearm crutches can make walking safer and help you take targeted weight off one leg. This guide shows you how to adjust forearm crutches correctly. Even a few centimetres too high or too low can cause pain in your hands, shoulders and back, or increase the risk of falling.

Your doctor’s instructions on weight-bearing always take precedence. Whether you can put no weight, partial weight or full weight on a leg depends on your diagnosis and treatment plan. Adjusting your walking aids correctly does not replace these instructions, but it does help you follow them safely in everyday life.

How to adjust forearm crutches correctly: a guide to handle height

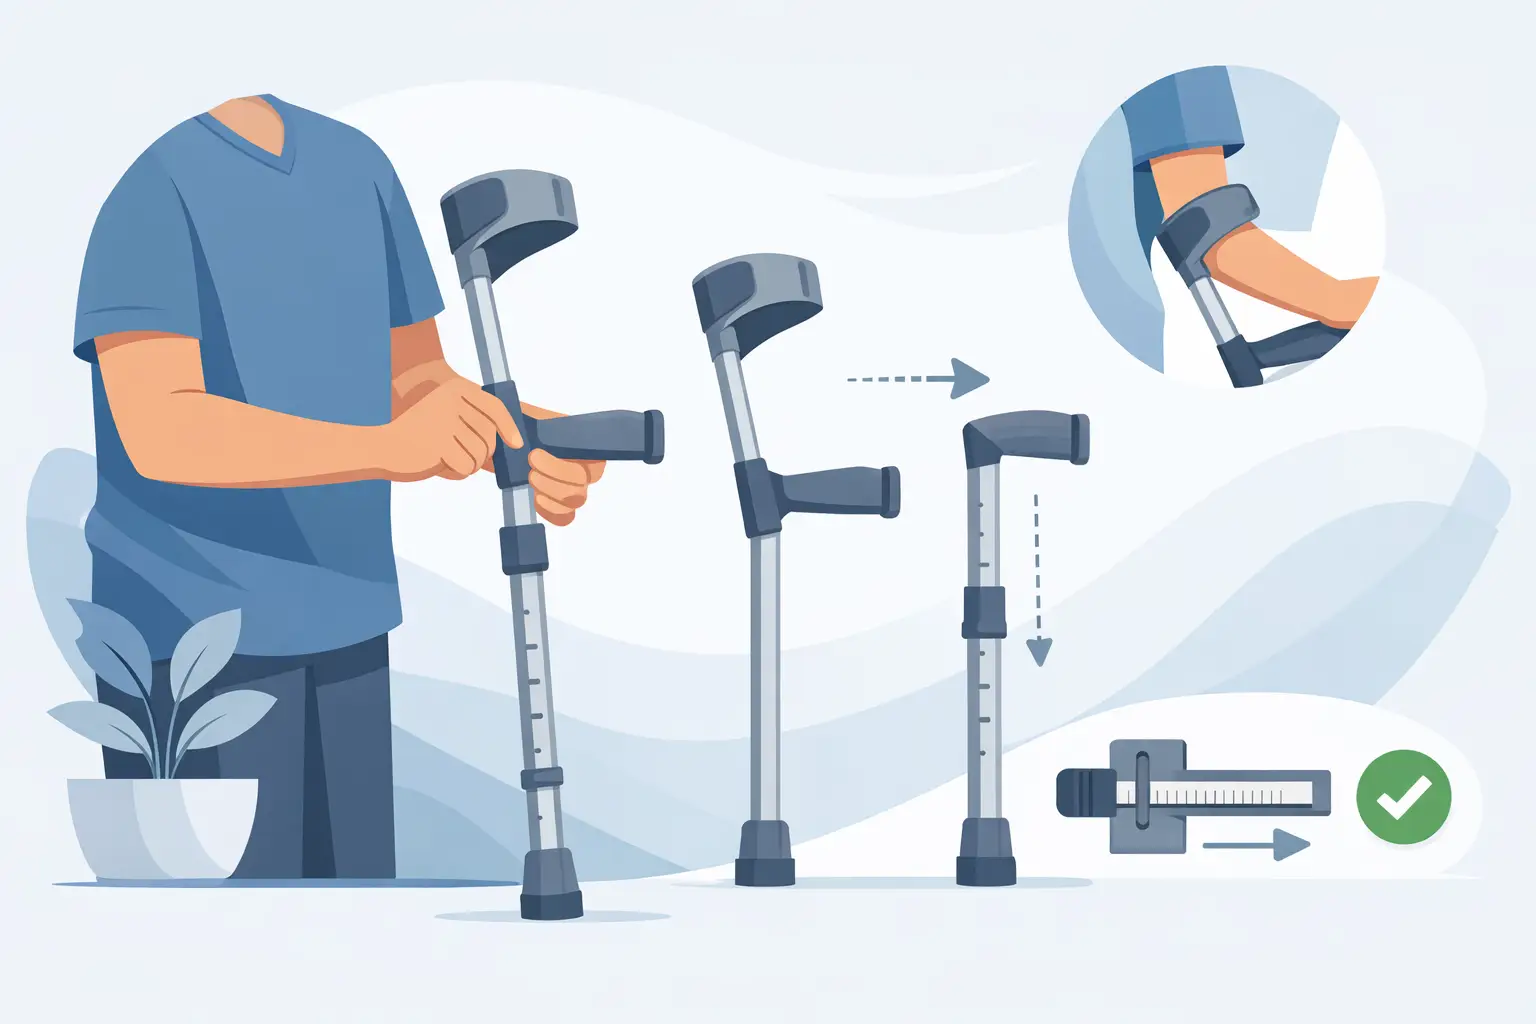
First, adjust the forearm crutches on a level, non-slip surface. Wear the shoes you will usually use when walking. The thickness of the soles has a significant effect on the required length. Also check that both crutches are set to the same height.

Stand upright. Keep your feet hip-width apart, relax your shoulders and let your arms hang loosely by your sides. The handle should be roughly level with your wrist—more precisely, with the wrist crease. At the correct height, your elbow should be slightly bent when you hold the handle, usually at an angle of about 15 to 30 degrees.

This slight bend is important: if the handles are too high, your shoulders will rise as you walk, putting strain on your neck and shoulders. If they are too low, you will have to lean far forward and support too much of your weight with your arms fully extended. This can put excessive strain on your wrists, elbows and lower back.

On height-adjustable models, loosen the connection, press in the locking button and select the same hole on both sides. The locking button must be fully visible and audibly click into place. Then pull firmly on the lower tube. If it moves, do not use the crutch.

Positioning the cuff correctly

The forearm cuff guides the walking aid. It should not sit directly in the bend of your elbow, but a few centimetres below it. As a guide, leave a gap of about two to three finger widths from the bend of your elbow. This allows your elbow to move freely as you walk without the cuff pressing or rubbing.

Depending on the model, you may be able to adjust the cuff’s height, circumference or opening direction. It should fit securely around your forearm without constricting it. Numbness, tingling, pressure marks or cold fingers are not normal. Loosen or adjust the cuff, and have a professional check the fit if the discomfort persists.

The cuff also has an important function: your body weight should be supported through the handles and your palms, not through the forearm cuffs. The cuffs mainly prevent the crutches from falling to the floor if you briefly let go. Prolonged pressure on the forearm can put strain on the skin, nerves and blood vessels.

Check before your first walk

After adjusting the crutches, take a few minutes to check that they are working safely. Start in a clear room with a firm, dry floor. Check whether you can stand straight without raising your shoulders or leaning to one side. Keep the crutches close to your body rather than placing them far out in front of you.

Also check the equipment for safety. The rubber tips must be intact, slip-resistant and evenly worn. Worn, split or hardened tips quickly lose their grip on smooth floors. Regularly check the screws, cuffs, handles and locking mechanisms. A connection can come loose, particularly after a fall or when transporting the crutches in a car.

For care facilities and family members: if several people prepare or reprocess walking aids, each aid’s settings must be clearly linked to the person who will use it. A similar height alone is not enough. Handle height, weight-bearing instructions, hand function and gait can vary considerably.

Walking safely with two forearm crutches

The correct walking sequence depends on how much weight you are allowed to put on the affected leg. Ask a member of staff at the hospital, a medical practice or your physiotherapy clinic to show you the technique prescribed for you. Instructions may differ, particularly after hip, knee, foot or ankle surgery.

If you are not allowed to put weight on one leg, or can only put limited weight on it, you will generally place both forearm crutches a short distance ahead of you first. Then move the affected leg between the crutches or up to their level. Next, bring the stronger leg forward. Keep your steps deliberately short. Taking large steps increases the risk of a crutch slipping or tipping sideways.

When partial weight-bearing is allowed, it can be difficult to judge how much weight you are putting on your leg: people in pain often take too much weight off it, while others put too much weight on it too soon out of habit. So follow the prescribed weight-bearing limit. If you have been given a specific limit in kilograms, your physiotherapist can help you practise controlling the amount using a bathroom scale.

Hold the handles firmly but without gripping them too tightly. An overly tight grip can cause pressure pain, blisters or irritation around the thumbs and the balls of the hands. Padded handles or gloves can reduce discomfort during prolonged use, but they do not replace a proper fit. If you have reduced hand strength, rheumatism, paralysis or significant pain, other handle styles or mobility aids may be more suitable.

Stairs, doors and uneven paths

There is a simple sequence to follow on stairs: when going up, place the stronger leg on the next step first. Then bring up the crutches and the affected leg. When going down, place the crutches on the lower step first, then the affected leg and finally the stronger leg. Always use a handrail if one is available.

Try not to carry anything in your hands. A shoulder bag, small backpack or transport accessory designed for your mobility aid is safer than a bag dangling from a handle. Take extra care around wet leaves, snow, loose gravel, cables or raised door thresholds. Walk slowly and avoid twisting on the leg bearing your weight.

Not every staircase is safe to use with forearm crutches. Narrow steps, a lack of handrails, poor lighting or significant balance problems may mean you need someone to accompany you or an alternative solution. Plan your routes realistically, especially right after surgery or if you have recently developed weakness.

Common signs that the fit is wrong

Discomfort does not always start straight away. As the day goes on, look out for warning signs such as tense shoulders, neck pain, pressure in your palms, numb fingers, sore forearms or worsening back pain. You should also have the fit checked if the crutches often slip, are positioned too far in front of your body when you walk or catch on your clothing.

You may also need to adjust the fit if your swelling changes, you switch to different shoes or your ability to bear weight improves during rehabilitation. For children, very tall people or people with severe obesity, the adjustment range of some standard models may not be sufficient. In these cases, check the weight capacity, length and cuff size before use.

When professional guidance is advisable

After recent surgery or an accident, or if your doctor has prescribed partial weight-bearing, a healthcare professional should ideally help you with the initial adjustment. The same applies if you have an unsteady gait, dizziness, impaired vision, a neurological condition or limited function in your hand or arm.

Seek advice promptly if your pain gets worse despite using the crutches correctly, pressure sores develop, a crutch is damaged or you repeatedly lose your balance. A different length, an ergonomic handle, a specialist model or an additional mobility aid may be a more suitable option.

Properly fitted forearm crutches should do more than help you take your next step. They provide the support you need to get around your home, go to therapy or manage everyday activities with greater control, reduced strain and independence.

Posted on

Is a wrist splint at night helpful for carpal tunnel syndrome?

Is wearing a wrist brace at night helpful for carpal tunnel syndrome?

If your fingers tingle at night, your hand falls asleep, or pain radiates into your forearm, sleep can quickly become a struggle. A wrist splint worn at night for carpal tunnel syndrome can help in many cases by keeping the wrist still and as straight as possible. However, it is not just any kind of brace: the fit, splint design and cause of the symptoms all determine whether it provides relief or causes additional discomfort.

Why symptoms are often worse at night

Carpal tunnel syndrome occurs when the median nerve is compressed in the wrist. This nerve supplies, among other areas, the thumb, index and middle fingers, and part of the ring finger. Typical symptoms include tingling, numbness, a burning pain or the sensation that the hand is swollen, even when no swelling is visible.

While asleep, many people unknowingly adopt an awkward hand position. The wrist bends, the hand rests under the head, or the fingers are tightly curled. This can increase pressure in the carpal tunnel. Symptoms are especially common in the second half of the night and often wake people, who then have to shake out their hand.

A night splint limits these involuntary movements. It keeps the wrist in a neutral or slightly extended position. This does not permanently change the space in the carpal tunnel, but it can reduce mechanical stress on the nerve. For mild to moderate symptoms, this is often a useful conservative treatment approach.

What a wrist splint can do at night

The main benefit is relief over several uninterrupted hours. If you wake up less often because of numbness or pain, you can rest better and often use your hand more comfortably during the day. A splint can also prevent an awkward sleeping position from repeatedly putting pressure on the nerve throughout the night.

There are limits to what it can do. A splint cannot resolve advanced nerve compression or causes such as inflammatory changes, hormonal factors or significant strain at work. It is also not necessarily the right solution for symptoms caused by the neck, osteoarthritis or another nerve disorder.

That is why it is important to monitor how symptoms progress. If symptoms occur only occasionally, a properly fitted night splint can often bring relief quickly. If numbness occurs during the day, grip strength decreases or you drop things more often, do not delay getting the symptoms assessed.

Choosing the right wrist splint for carpal tunnel syndrome at night

A stabilizing wrist orthosis with an integrated splint is generally used at night. Unlike a soft brace, it reliably limits wrist flexion and hyperextension. A compression bandage alone may feel comfortable, but it often does not provide enough support for carpal tunnel syndrome.

The splint should stabilize the wrist without unnecessarily restricting finger movement. The thumb, knuckles and palm should remain free enough for you to move your hand in the morning without stiffness. Models for the right and left hand have different anatomical shapes, so choosing the correct side is more than a minor detail.

Look for a breathable cover, flat seams and well-positioned fasteners. Pressure from edges and straps can cause skin irritation without you noticing, especially if you have sensitive skin, vein problems or reduced sensation. For people who need care or have limited hand function, wide, easy-to-grip hook-and-loop fasteners are particularly practical for everyday use.

The size is based on the manufacturer’s specifications, usually according to wrist circumference. Measure directly over the wrist bone with a tape measure, without pulling it tight. If the measurement is close to a size boundary, professional advice can be helpful. An orthosis that is too small will press on the wrist; one that is too large may slip and fail to hold the wrist in the desired position reliably.

The splint position is crucial

Not every fixed position is therapeutically appropriate. The wrist should not be bent sharply upward or toward the palm. The aim is to keep it straight and relaxed. On many models, the integrated aluminum or plastic splint can be carefully adjusted. This should only be done according to the manufacturer’s instructions and, ideally, with professional guidance to avoid pressure points.

A thumb splint is only necessary if the thumb carpometacarpal joint, tendons or other structures also need stabilizing. For isolated carpal tunnel syndrome, unnecessary thumb immobilization can impair hand function and sleep comfort.

How to use the splint at night

Before going to bed, put the orthosis on dry skin. If you have applied lotion, wait until it has been fully absorbed. Position your hand flat in the splint and fasten the straps from closest to the body to farthest from the body, unless the manufacturer specifies a different order. The orthosis should fit securely but must not constrict.

A simple self-check can help: your fingertips should stay warm and retain their normal color. Increased tingling, throbbing pressure, a cold sensation or new numbness after putting on the splint are warning signs that it is too tight or that the splint is not positioned correctly. Remove it and check the size and fit.

The orthosis may feel unusual during the first few nights. Some people find it helpful to wear it for short periods of rest at home at first. This does not replace wearing it at night, but can make it easier to get used to. A night splint should only be worn during the day if medically recommended. Immobilizing the wrist for long periods can restrict mobility and unnecessarily reduce the workload on the hand muscles.

Clean the orthosis according to the care instructions. Removable fabric parts can be washed on many models, while splints and hook-and-loop fasteners usually only need to be wiped with a damp cloth. Check regularly that the fasteners still hold securely and that no sharp edges, material damage or deformation have developed.

When to seek medical assessment

A night splint is not intended for self-treating significant symptoms over an extended period. Seek medical advice promptly if numbness no longer subsides, the muscles at the base of the thumb become visibly weaker or fine motor skills decline. Severe pain, sudden paralysis or symptoms following an injury should also be assessed.

In a clinical setting, symptoms, physical tests and, if needed, a nerve conduction study can help determine whether carpal tunnel syndrome is actually present and how severely the nerve is affected. Depending on the findings, options in addition to an orthosis may include adjustments to everyday activities, physiotherapy, anti-inflammatory measures, injections or, in cases of advanced compression, surgical decompression.

Work-related strain deserves particular attention. Repeated forceful gripping, working with vibrating tools or prolonged work with the hand in an awkward position can make symptoms worse. A night splint can help in these cases, but it does not replace ergonomic adjustments to the workstation or work processes.

Prescription, coverage and everyday practicality

If carpal tunnel syndrome has been diagnosed by a doctor, a wrist orthosis may be prescribed. Whether and to what extent the costs are covered depends on the prescription, the medical aid agreement and the requirements of the relevant health insurance provider. For reimbursement, it is helpful to specify the product precisely so that the side, size and required level of stabilization can be clearly taken into account.

At home, keep the splint somewhere it can be reached easily at night without having to search for it. It can be helpful for family members and caregivers to check the correct position for putting it on together with the user. This is especially important if the person has difficulty fastening it independently because of poor eyesight, arthritis or limited finger mobility.

A well-fitting night splint is primarily a practical aid for more restful nights and better hand function in the morning. If it presses, slips or does not improve symptoms, there is no need to simply put up with it: have the fit and coverage reviewed and seek professional advice.

Posted on

Buy a donning aid for compression stockings

Buy a compression stocking aid

Compression stockings should fit evenly, must not dig into the skin, and need to be pulled up to the prescribed height. This can become a daily challenge for people with reduced hand strength, back problems, arthritis or those recovering from surgery. If you want to buy a donning aid for compression stockings, you should therefore consider more than just the price. The key factors are the type of stocking, compression class, the user’s mobility and the specific care situation.

The right donning aid reduces the effort required and helps you put on the stocking without damaging the material. This is particularly important because creases, twisting or uneven tension can compromise the effectiveness of medical compression. For many people, this aid offers one key benefit: the ability to incorporate compression therapy into their daily routine independently and reliably.

Why a donning aid is useful for compression stockings

Medical compression stockings apply a defined level of pressure to the leg. This pressure decreases from the bottom upwards and, depending on the doctor’s prescription, supports venous return. For the treatment to work as intended, the stocking must be put on correctly. With compression class II or higher in particular, people often do not have enough strength in their hands and fingers to manage this on their own.

A donning aid holds the stocking open as you pull it on or provides a smooth gliding surface between the foot, leg and material. This eliminates the need for difficult gripping, pulling and gradually working the stocking upwards. It reduces strain on the hands, shoulders and back—for both people putting on their own stockings and their family members or caregivers.

However, it is no substitute for having the stockings professionally fitted. If you experience pain, pressure marks, numbness or changes in your leg, have your compression garments checked promptly by a doctor, medical supply store or healthcare professional. Special medical guidance also applies in cases of open wounds, significant skin changes or arterial circulation problems.

Which donning aid is right for your compression garments?

Start with a simple question: Are you wearing knee-high or thigh-high stockings, tights, or models with an open toe? Not every donning aid is suitable for every type. Always check the product description and manufacturer’s information against your existing compression garments.

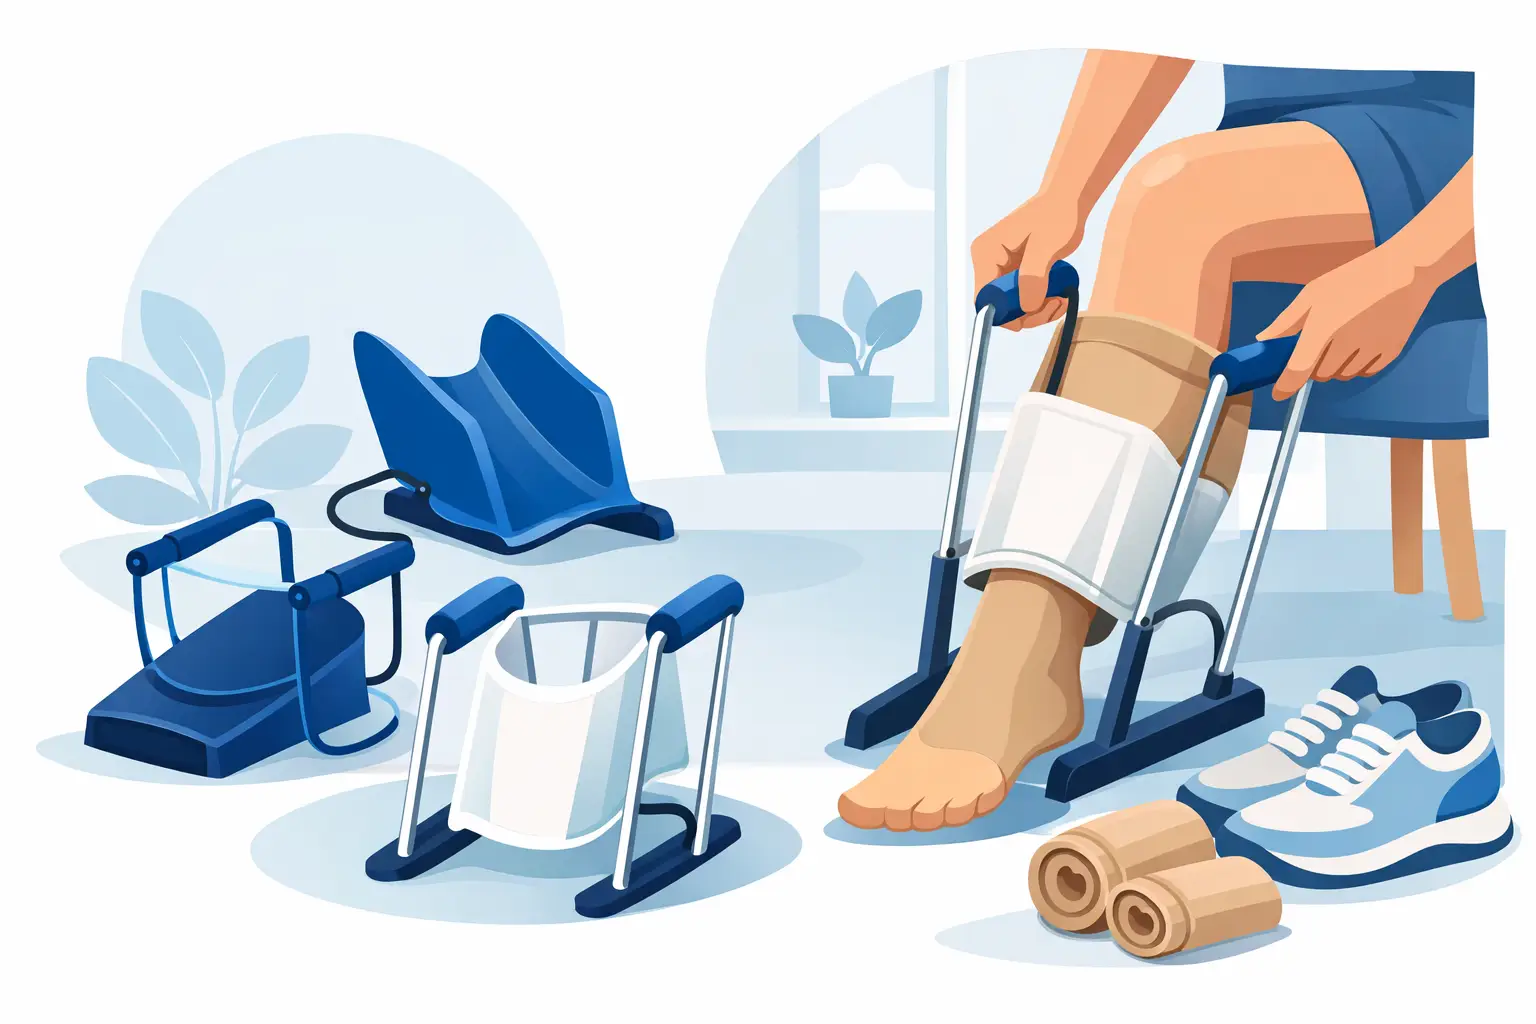
Frame-style donning aids for reduced hand strength

Frame-style donning aids usually consist of a sturdy, coated metal frame. The compression stocking is stretched over the frame so that the foot opening remains wide open. You then place your foot inside and pull the stocking over your heel and lower leg using the handles.

This type is particularly suitable for people with reduced grip strength or limited mobility in the hips or back, as well as those who find it difficult to bend forward. Long handles can further reduce the range of motion required. Look for a sufficiently wide, stable design that suits your foot and calf measurements.

However, a frame is less practical for travel and takes up space when stored. People with very muscular calves, those wearing thigh-high stockings or those with certain custom-made garments may need a special model.

Glide socks and sliding aids for open-toe stockings

Glide socks are pulled over the foot before putting on the compression stocking. They help the stocking slide more easily over the heel and instep. The gliding aid is then removed through the open toe. These products are lightweight, compact and well suited to travel.

They assume that the person can at least partially grip the stocking and position it on the leg. They are therefore not always the best choice for users with severely limited hand function. Classic glide socks often do not work with closed toes. Depending on the system, other donning or doffing aids may be suitable instead.

Donning aids with straps or cuffs

With strap and cuff systems, the stocking is guided over a smooth sleeve or a textile aid. Pull straps make it easier to pull the stocking up without having to tug directly on the delicate stocking material. Depending on the design, these systems are suitable for knee-high and thigh-high stockings, and sometimes also for compression tights.

Their advantages include flexible use and low weight. However, they require a little more practice than a rigid frame. Especially when starting a new treatment, it is worth taking time to practise putting the stocking on or asking a healthcare professional to explain how to use the aid.

What to look for when buying

Compression class is an important criterion when buying a compression stocking donning aid. The greater the pressure exerted by the stocking, the more stable and effective the aid should be when helping you put it on. A simple glide aid may be sufficient for light compression, while a frame with handles or a compatible system may be more suitable for stronger compression.

The type of stocking is also relevant. Open-toe and closed-toe stockings require different solutions. For thigh-high stockings, the donning aid must be long enough or designed to guide the material further up in a controlled way. For tights, it is also important to consider whether both legs can be put on one after the other and how easily the material can be smoothed over the hips.

Also consider the user’s physical abilities. Anyone who has difficulty standing needs an aid that can be used safely while seated. For people with hemiplegia, advanced osteoarthritis, Parkinson’s disease or those recovering from shoulder surgery, a model with long handles, a non-slip base and clear guidance can be particularly helpful. For home care, ease of cleaning, material durability and reliable handling by different caregivers are also important.

How to put the stocking on without damaging it

The skin should be dry. After applying cream, it is advisable to wait until it has been fully absorbed, as moisture makes the stocking harder to put on and can strain the fibres. Remove jewellery from your hands and wrists to avoid snagging threads. If needed, specially designed gloves with a textured surface can improve grip and help distribute the stocking evenly.

First, place the stocking on the donning aid according to the instructions. With a frame, position the heel in the designated spot before inserting the foot. Then slowly guide the material over the heel and calf without jerking. Do not pull on the top band. Instead, use flat hands to smooth the stocking upwards section by section.

Once the stocking is in place, smooth out any wrinkles from the bottom up. The heel must be correctly positioned, and the top band must not be folded over or rolled down. A constricting edge can cause discomfort. For open-toe stockings, check the toe area as well: the toes must not be squeezed and should remain free to move.

Donning aid, doffing aid or both?

Taking off medical compression stockings also requires considerable strength. Some users manage with the same aid, while others benefit from an additional doffing aid or gloves. Older stockings, warm skin or limited finger mobility can make taking them off much harder than expected.

Anyone who wears compression garments every day should consider the entire routine: putting them on in the morning, checking the fit, taking them off in the evening and caring for the stockings. A solution that only works for putting them on in the morning but makes taking them off difficult provides only partial support for independent living. For care facilities, standardised equipment that is easy to explain and use can also make workflows more efficient.

When to seek professional advice

Professional advice is particularly useful when getting compression garments for the first time, ordering made-to-measure stockings or if the stocking size is unclear. The same applies if the donning aid does not slide over the heel, the stocking wrinkles despite being used correctly or pain occurs. An unsuitable combination of stocking and aid can make daily therapy unnecessarily difficult.

At Servomed, users and professional buyers can find aids for compression therapy, as well as complementary products for mobility, care and everyday life at home. To make the right choice, carefully check the information about the stocking type, the required handle height and the intended use.

The best donning aid is one that can be used in the morning without rushing and puts the compression stocking smoothly and securely in the right position every day with as little effort as possible.

Posted on

Apply for a care bed at home: Requirements

How to apply for a care bed at home: eligibility requirements

A care bed can make everyday life at home noticeably safer: when getting up, providing personal care, repositioning, and reducing the strain on family caregivers. Anyone wishing to apply for a care bed at home should document their individual care needs early and clarify before making a purchase whether the long-term care insurance fund or health insurer is responsible. Not every electrically adjustable bed is automatically approved as a medical aid.

When is a care bed medically or care-wise necessary?

A care bed is a technical aid for people who, due to illness, disability, or limited mobility, cannot be cared for safely in a conventional bed. Typical reasons include significantly limited ability to walk or stand, a high risk of falling, paralysis, neurological conditions, advanced dementia, or the increased effort required to transfer the person.

Age or an existing care grade alone is not decisive. The insurer assesses whether, in the specific case, the bed makes home care easier, alleviates symptoms, or enables a more independent lifestyle. For example, the electric height adjustment can help someone transfer safely from the bed to a wheelchair or make transfers easier on caregivers’ backs. Adjustable back and leg sections support appropriate positioning, for example in cases of shortness of breath, oedema, or limited physical capacity.

Side rails can help prevent someone from accidentally falling out of bed. However, they are not standard equipment for everyone. For people who are restless or have impaired orientation, the benefits, risk of falling, and potential restrictive effect on their freedom must be carefully weighed. Advice from nursing professionals, doctors, or a qualified medical aid provider is especially helpful in these cases.

Long-term care insurance fund or health insurer: Who covers the provision?

Whether the long-term care insurance fund or statutory health insurer is responsible depends on the purpose of the provision. If the main aim is to make home care easier, support independent living, or alleviate symptoms related to the need for care, the long-term care insurance fund is often the cost bearer. An officially recognised care grade and care provided in the home are generally required.

If the bed is needed primarily to treat an illness, for example for medically necessary positioning or to support a doctor-prescribed treatment, the statutory health insurer may be responsible. In practice, the distinction is not always clear. A doctor’s prescription with a clear justification makes it easier to determine responsibility and often speeds up processing.

People with private insurance should contact their insurer or benefits office in advance. Contract terms, reimbursement limits, and required documentation can vary considerably. For people with statutory insurance, the specific process also depends on the service providers with whom their insurer has entered into care agreements.

Apply for a care bed at home: The practical process

Start with a realistic assessment of the person’s needs. For a few days, note which situations in bed are difficult or unsafe: Is getting up only possible with considerable assistance? Does the person need to be repositioned regularly? Can family caregivers still transfer them without excessive physical strain? These specific details are more informative than a general description of the person’s care needs.

Then discuss the need with the GP’s practice, a specialist practice or an outpatient care service. Coverage through health insurance usually requires a doctor’s prescription. For coverage through long-term care insurance, an application for a technical care aid may also or instead be required. The long-term care insurance fund reviews each case individually and may consult the Medical Service.

A medical supply store or specialist provider can help you choose a suitable model and provide a cost estimate if needed. It is important not to place a binding order until coverage has been confirmed. Anyone who buys a care bed before approval risks having to pay all or part of the cost themselves.

The following documents are particularly helpful when submitting an application:

  • a doctor’s prescription or medical statement specifying the diagnosis and purpose of the care
  • information about the care level, if already assigned
  • a description of limitations affecting transfers, repositioning and care
  • if needed, a cost estimate from the intended service provider

The more clearly the documents explain why a standard bed is not sufficient, the easier it is for the insurer to assess the need. Statements such as “makes care easier” should therefore be supplemented with specific details, such as the need for height adjustment, regular repositioning or safe mobilisation at the edge of the bed.

Act quickly if care is urgently needed

A care bed may be needed at short notice following a hospital stay, a stroke or a sudden deterioration in health. In these situations, speak to the hospital’s social services team or discharge coordination team as early as possible. The treating doctor’s practice and outpatient care service can also document the urgency.

Provisional coverage is not governed in the same way by every insurer or in every situation. The responsible insurer should therefore be informed immediately. When planning a medical discharge, providing clear details about the required aid can prevent care at home from starting without suitable equipment.

Choosing the right care bed for care at home

A standard care bed usually has electrically adjustable back and thigh sections as well as height adjustment. These features are sufficient for many care needs. However, depending on the medical condition and living situation, additional features may be required, such as a low entry height to help prevent falls, a higher and safe working position for care, or a higher load capacity.

The sleeping surface should also be included in the planning. If there is an increased risk of pressure ulcers, a standard mattress may not be sufficient. A specialised pressure-relief aid, such as an alternating pressure mattress or a high-quality anti-decubitus foam mattress, may then be necessary. This aid is often assessed separately and should therefore not automatically be included as part of every care bed provision.

The room must also be suitable. The bed needs enough space for care, transfers and, where applicable, a wheelchair or walking frame. Power sockets, lighting and the route to the door should remain safely accessible. Also check whether rug edges, narrow passageways or loose cables increase the risk of falls. A care bed can only fully improve care if the surrounding environment is safe as well.

Costs, co-payments and loan arrangements

Technical care aids are often provided on loan. This is convenient because maintenance, repairs and subsequent collection are generally arranged by the provider. Whether a copayment is required, and how much it will be, depends on the responsible payer, the type of provision and any applicable exemptions.

Different rules apply to provision through long-term care insurance than to the provision of medical aids through health insurance. For people with statutory health insurance, a statutory copayment may apply unless they are exempt. Insured persons receive specific information before delivery from the health insurer’s contracted provider or directly from their insurer.

If you want a model with features or equipment beyond what is considered necessary, you may have to pay a share of the cost yourself. This may include special design options or comfort features that are not medically or care-related necessities. Always ask for an explanation of any additional costs in writing before placing your order.

After approval: delivery, instruction and adjustment

When the bed is delivered, it should be professionally assembled and its functions checked. Make sure you receive a clear explanation of how to operate it: height adjustment, back and leg adjustment, brakes, hand control and, where applicable, side rails. Family members providing care should also receive instructions, as incorrect use can lead to falls, entrapment or unnecessary physical strain.

During the first few days, check whether the bed height, mattress and positioning are actually suitable for the person’s needs. Changes in health may make adjustments necessary. If the bed is faulty, care needs increase or a move is planned, inform the provider or insurer promptly. Do not make any alterations to a loan bed yourself.

What should you do if your application is rejected?

A rejection should always be issued in writing and include reasons. Check whether the need was described in sufficient detail or whether any documents are missing. You can generally appeal a decision within one month. An additional medical opinion, an assessment by the care service or a detailed description of the person’s daily care situation can support your appeal.

If the provision remains unresolved, seeking advice again may also help. Sometimes the nursing bed itself is suitable, but the model requested does not meet the insurer’s criteria. Appropriate provision supported by clear reasons protects the person in need of care and also eases the burden on everyone who takes responsibility for their care each day.

A nursing bed is more than a piece of furniture. When chosen carefully and applied for properly, it creates safe conditions for rest, mobility and dignified care at home.